
Quick Overview: This guide explains how to set up Google Analytics 4 (GA4) and Google Tag Manager (GTM) on your Shopify store, covering installation methods, key tracking features, Shopify plan considerations, best practices, and how GA4 improves marketing performance and ROI.
Data is what makes decisions smarter in today’s competitive world of online shopping. In this blog, we’ll walk you through everything you need to know about How to Add Google Analytic 4 on Shopify (with or without GTM). If you own a Shopify business, it’s important to know where your visitors come from, how they use your products, and why they buy (or don’t). That’s where Google Analytics 4 (GA4) comes in.
Google created GA4, their most recent analytics tool, to take the role of Universal Analytics. You can improve customer journeys, increase revenue, and optimize marketing campaigns with its strong insights, cross-device measurement, and advanced tracking. Tracking custom events and managing all of your tags in one location is made much more flexible when combined with Google Tag Manager (GTM).
What is Google Analytic(GA4)?
Google Analytics 4 (GA4) is Google’s current analytics platform (replacing Universal Analytics). It tracks events (actions like page views, add to cart, purchases) instead of just page hits, giving more flexible reporting. It’s designed for cross-device tracking (web + apps) and uses event-based data models with predictive metrics and better integration with Google Ads.
Why You Should Install and Setup GA4 on Your Shopify Store?
Using GA4 with Shopify helps you get deeper insights into your store’s performance and customer journey. Here’s why it’s valuable:
- Track the full funnel: See how visitors move from browsing to checkout to purchase.
- Event-based tracking: Capture detailed actions (add to cart, product views, checkout steps) instead of just page views.
- Cross-device insights: Understand how customers interact on mobile, desktop, and apps.
- Better attribution: See which channels (ads, social, email, SEO) actually drive sales.
- Enhanced remarketing: Build audiences in GA4 and sync them with Google Ads for smarter targeting.
- Future-proof analytics: Universal Analytics is gone; GA4 is the standard moving forward.
GA4 helps Shopify store owners measure sales, optimize marketing, and grow revenue with more accurate data.
What Things Install and Setup Google Analytic(GA4) for Tracks on Shopify
By default (with proper setup), GA4 can track:
- Page views (all store pages)
- View item (product page views)
- Add to cart
- Begin checkout
- Add payment info
- Purchase (transaction value, items, currency)
However, the inclusion of all events and characteristics varies according on the approach you take. Configurations that are more complex can include:View item list (collections / category pages)
- Remove from cart
- Refunds
- Promotions (coupon applied, promotion clicks)
- Variant IDs, product categories, coupon codes, etc.
Shopify Plan Considerations
- Standard Shopify Plans: Limited access to checkout pages → purchase tracking must be done via “Additional scripts” or apps.
- Shopify Plus: More checkout customization (checkout.liquid), easier to implement GTM or advanced GA4 ecommerce tracking.
- New Checkout Extensibility: Shopify is phasing out direct checkout.liquid edits → encourages Custom Pixels and app embeds for tracking.
Read More About : How Much Does Shopify Website Development Cost?
How to Install Google Analytic(GA4) on Shopify?
Google Analytic on Shopify must be added in order to track store performance and comprehend customer behavior. Google Tag Manager (GTM), the Google and YouTube Channel App, GTAG, and Shopify Analytics Apps are the four main ways to integrate Google Analytics with your Shopify store.
How to Create a GA4 Property in Google Analytics
Step 1: Sign in to your Google Analytic account for Shopify
- Go to Google Analytics.
- Log in with your Google account (ideally the same one you use for Google Ads, Merchant Center, etc.).
Step 2: Open the Admin settings in Google Analytic
- In the bottom-left, click the gear icon (Admin).
- Under the Account column, make sure you’re in the right Google Analytics account (you can have multiple).
Step 3: Create a new property for tracking Google Analytics on Shopify
- In the Property column, click + Create Property.
- Enter:
- Property name (e.g. My Shopify Store).
- Reporting time zone (choose your store’s main timezone).
- Currency (choose your store’s selling currency).
- Click Next, select your business size & industry category (optional, doesn’t affect tracking).
- Click Create.
Step 4: Add a Data Stream (Website) for your Shopify store
- After creating the property, GA4 will prompt you to set up a Data Stream.
- Choose Web.
- Enter your Shopify store’s URL (without /admin, just the storefront domain).
- Name the stream (e.g. Shopify Store Stream).
- Click Create Stream.
Step 5: Select Your Measurement ID
Once the data stream is created, you’ll see a Measurement ID (format: G-XXXXXXXXXX).
Ways to Connect Google Analytic(GA4) with Shopify
| Method | Best For |
| Manual gtag.js code | Developers / full control |
| Google Tag Manager (GTM) | Advanced tracking / marketers |
| Google & YouTube Sales Channel (native) | Beginners / quick setup |
| Third-party apps | Stores wanting “full” ecommerce tracking without coding |
Hear are 3 Methods to Install and Setup Google Analytic on Shopify:
Method 1: Getting Started with GTAG
Google offers GTAG, which stands for Global Site Tag. It is a JavaScript tagging framework. It makes it easier and more consistent to add and manage monitoring tags for different Google applications, such Google Analytics and Google Ads.
Website owners can use GTAG to track things like page views, events, and e-commerce transactions that people do on their sites and send that information to their Google accounts for analytics or advertising reasons.
Google Tag Manager (GTM) gives you more control over how tracking codes are added, while GTAG’s straight way is more strict. To set up Google Analytic for Shopify with GTAG, do these things:
Step 1: Enhance Your Shopify Theme with GTAG
Copy the GTAG Code:
- Log in to your GA4 account and navigate to the installation instructions.
- Copy the GTAG code snippet provided. It will look something like this:

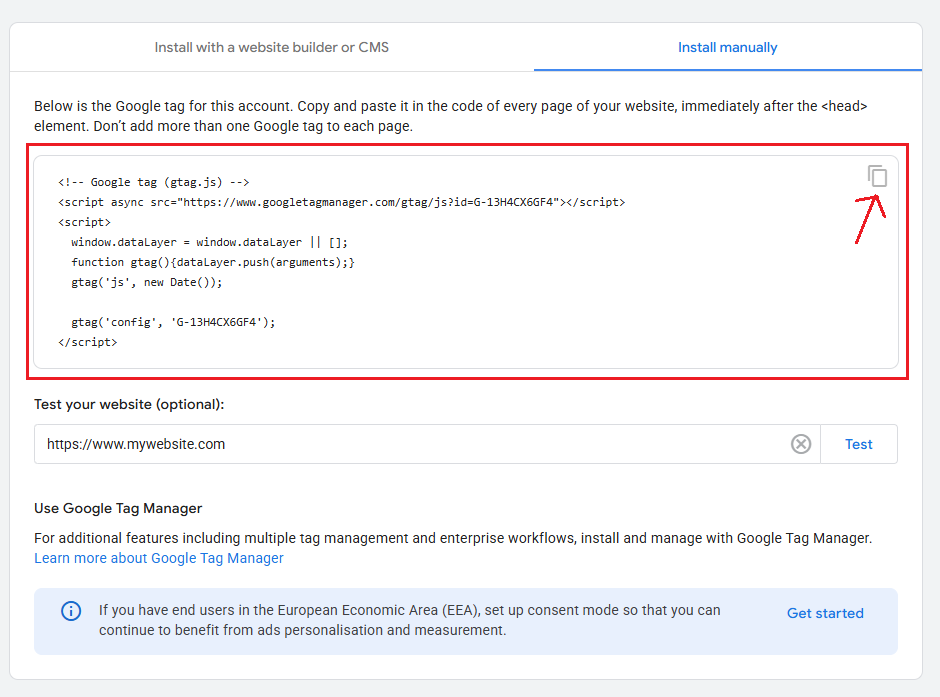
Access the Shopify Theme Editor:
- Go to your Shopify admin section.
- Navigate to Online Store → Themes.
- Click the three dots next to the “Customize” button and select Edit code.

Edit the theme. Liquid File:
- Open the theme. liquid file from the list of available files.
- Locate the <head> section in the file.
- Paste the copied GTAG code right below the <meta> tags.
- Save the Changes:
- Click Save to ensure the GTAG is added successfully.


Explore further: How to Choose Best Shopify Theme for Your Online Store
Step 2: Test the Setup
- Use Debug View in GA4:
- In your GA4 property, navigate to Admin → Debug View.
- Test Events:
- Visit your Shopify store with the Google Analytics Debugger enabled.
- Perform a test purchase.
- Check the Debug View in GA4 to verify if the events are being recorded correctly.
Need expert help with GA4 and GTM setup?
Method 2: Install Google Analytic(GA4) in Shopify With GTM
Effective tracking of user behavior and store performance is made possible by integrating Google Analytics with Shopify through Google Tag Manager (GTM). Here is a thorough, step-by-step tutorial:
Step 1: Set Up a Google Tag Manager Account
- Go to Google Tag Manager.
- Click Create Account and follow these steps:
- Account Name: Enter a name for your account (e.g., your business name).
- Container Setup: Choose Web as the target platform.
- Once created, your GTM container is ready for use.
- GTM will provide two scripts to embed in your Shopify store.


Step 2: Upgrade to Checkout Extensibility
- Go to Settings → Checkout in Shopify.
- Upgrade to Checkout Extensibility if you haven’t done so already.
Step 3: Insert GTM Scripts into Shopify
1. gtm-customer-events-storefront
- Go to Online Store → Themes → Edit Code .
- Choose the snippets option and click on the add a new snippet tab.
- Create a new snippet named gtm-customer-events-storefront.
- Paste the content of the gtm-customer-events-storefront script into this snippet.
2. Theme Script
- Open the theme. Liquid file in the Shopify code editor.
- Paste the theme script into the <head> section as high as possible.
- Include the gtm-customer-events-storefront snippet for clean code organization.
3. Custom Pixel Script
- Navigate to Settings → Customer Events → Add Custom Pixel.
- Name the pixel (e.g., “GTM Pixel”).
- Set these options:
- Permission: Not required.
- Data Sale: This does not qualify as a data sale.
- Replace the placeholder code in Shopify with the content of the custom pixel script.
Step 4: Configure Google Analytics in GTM
1. Create a New Tag:
- Go to Tags → New → Tag Configuration.
- Select Google Analytics → Google tag.

2. Enter Your GA4 Measurement ID:
- Find your Measurement ID in your GA4 account under Admin → Data Streams → Web → Measurement ID.
- Copy and paste this ID into the Tag Configuration.

3. Disable Automatic Page View Tracking:
- Set the send_page_view parameter to false.
4. Set the Trigger:
- Choose All Pages as the trigger.
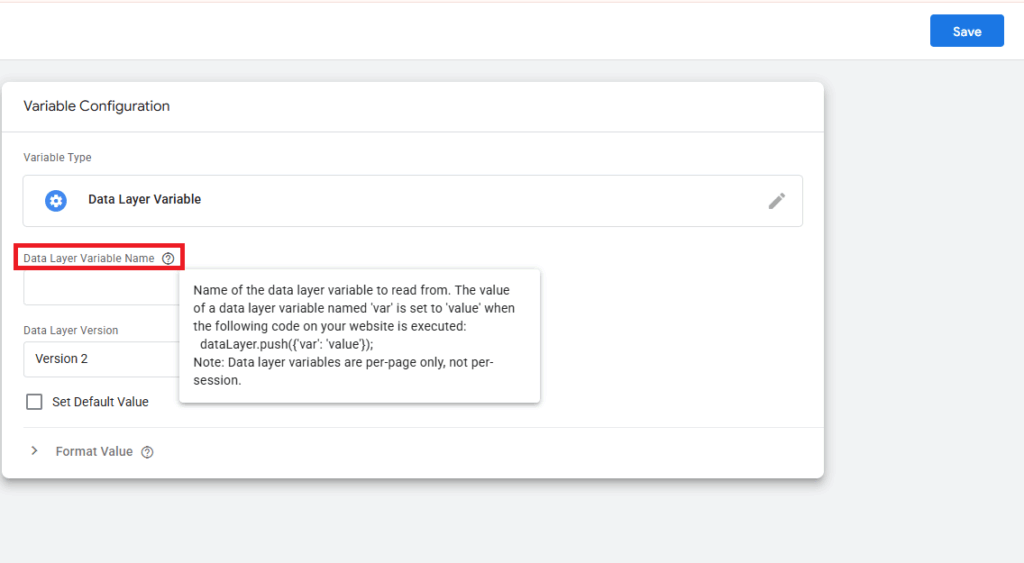
Step 5: Add Data Layer Variables
1. Go to Variables → New → Variable Configuration → Data Layer Variable.
2. Create Variables:
Create the following three variables one by one to capture clean page data:
- Page Location (page_location)
- Page Referrer (page_referrer)
- Page Title (page_title)
Step 6: Set Up an Event Settings Variable
1. Navigate to User-Defined Variables.
- Create a new variable with Google Tag: Event Settings Variable.
2. Add Parameters
- page_location
- page_referrer
- page_title
Centralizing these parameters ensures they can be reused across multiple events.
Step 7: Create a GA4 Event Tag
1. Create a new GA4 Event Tag in GTM.
2. Add Event Parameters
- Use the Event Settings Variable you created earlier under Event Parameters.
This ensures the polluted page location is replaced with the clean data from the parent frame.
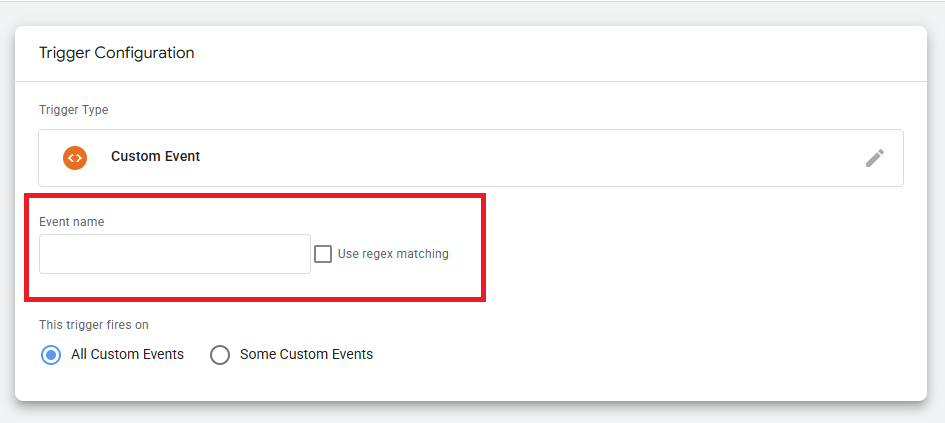
Step 8: Configure a Custom Event Trigger
1. Create a New Trigger
- Add a Custom Event Trigger using the event name page_view.
This event name matches the custom pixel code, which pushes page_view data to the data layer.
Step 9: Update the GA4 Configuration Tag
- Link the Event Settings Variable to the Google Tag in your GA4 configuration tag.
This step integrates clean page information into your GA4 tracking setup.
Step 10: Test the Integration
1. Preview in GTM:
- Use GTM’s Preview Mode to verify that your tags fire correctly when navigating your Shopify store.
2. Verify in Google Analytics:
- Check the real-time reports in GA4 to confirm data is being received.
Publish the GTM Container after testing is finished and everything is functioning as it should. Click Submit in GTM to make the container public. Track user activity and sales performance with Google Analytic statistics for your Shopify business.
By following these instructions, you will successfully integrate Google statistics with GTM in Shopify, giving your e-commerce site access to robust tracking features and analytical statistics.
Method 3: Install Google Analytic(GA4) with Google & YouTube Channel App
The Google & YouTube Channel App is one of the simplest ways to install and setup Google Analytics 4 (GA4). The Google & YouTube Channel App for GA4 has taking the place of Shopify’s native Universal Analytics (UA) integration. The procedures to install Google Analytic 4 on Shopify via the Google & YouTube channel app are as follows:
Step 1: Log in to Shopify Admin and open the App Store
- Log in to your Shopify Admin dashboard.
- From the left menu, click Apps → Shopify App Store.
Step 2: Search and install the Google & YouTube app for Google Analytic on Shopify
- In the App Store, search for “Google & YouTube”.
- Click the app and hit the “Install” button.
- Approve all the necessary permissions and finally install it.

Step 3: Link your Google Account to Shopify
- After installation, the app will prompt you to connect your Google account.
- Choose the Google account that manages your Google Analytics and Google Ads (if applicable).
- Grant the necessary access to link your Shopify store with Google.

Step 4: Connect your Google Analytics 4 property with Shopify
- After connecting with Google account, click on get started to connect it with Google Analytics.
- If you already have a GA4 property, simply select it from the list and click on connect tab.
- The app will automatically connect it to your Shopify store.
Step 5: Verify tracking is working in GA4
- Open your Google Analytics dashboard.
- Go to Admin → Data Streams → Web, and click your stream.
- Confirm that Shopify’s data stream ID is active.

Visit your Shopify store in a new tab and check Real-time reports in GA4 to see if your visit is tracked. The setup is complete once you see your events populating and your Shopify store successfully connects to GA4.
After you set up the Google & YouTube Channel App, you can monitor e-commerce events like item views, adding to a cart, and transactions as well as general events like page views, clicks, video interactions, and form submissions. These stats help you better understand how customers utilize your Shopify store.
Common Pitfalls to Avoid During GA4 Install and Setup
- Avoid duplicate tracking: only one method of GA4 tag injection should be active, or ensure different methods are configured to not double fire events.
- Ensure purchase/order confirmation pages are tracked: critical for revenue data. On non-Plus Shopify plans you may have limitations in editing every checkout page.
- Filtering internal traffic: implementing cookie / privacy consent where required.
- Use enhanced measurement: features in GA4 (scrolls, file downloads, etc.) if they make sense.
- Check and handle abandoned cart: checkout abandonment via events.
Build, scale, and succeed with Shopify.
We’ll help you optimize your store, boost performance, and maximize revenue.
Why Google Analytic 4 Is Essential for Measuring Marketing Success
- Show how tracking helps optimize Google Ads, Facebook Ads, and email campaigns.
- Add examples: “If you see high add-to-cart but low purchases, maybe improve checkout or payment options.”
Wrapping Up: Your Path to Smarter Shopify Analytics
Setting up Google Analytics 4 (GA4) on your Shopify store is more than simply a technical task; it’s a way to learn more about your consumers and make better business decisions. GA4 lets you track the whole shopping journey, from product views to completed sales. You can do this with the simple Google & YouTube Channel app, the flexible Google Tag Manager (GTM), or by setting up GTAG manually.
By following the steps and best practices in this tutorial, you will not only make sure that your data is collected correctly, but you will also get useful information that will help you improve your marketing, cut down on wasteful ad spending, and increase your store’s sales.
Now that your Shopify store has GA4, you need to start using the data. Look at your reports, try out different campaigns, and keep making your customers’ experience better. If you have the correct tracking in place, you can use analytics to help your business flourish. Accurate analytics is key to making data-driven decisions. For a seamless Install and Setup GA4, Shopify optimization, check out our Shopify services today.
Found this post helpful? Don't forget to share it with your network!


")