Quick Overview: It’s exciting to launch your Shopify store, but the first thing you need to do is add your products. If your listings aren’t set up right, you could lose sales, confuse clients, or miss out on SEO chances. This blog post breaks the process down into easy-to-follow steps so you can set up your first product (or hundreds of them) in your Shopify store with confidence.
One of the most crucial things you can do to run a successful online business is to set up your products appropriately on Shopify. This blog post shows you how to add a product to Shopify step by step, from writing names and descriptions to uploading pictures, keeping track of stock, setting up shipping, and improving the site’s search engine optimization (SEO). With insights from a Shopify expert perspective, this blog will help you make sure that your Shopify listings are professional, easy to find, and good at persuading people to buy from you, whether you’re just starting out with your store or want to improve your product setup.
Essential Checklist Before Adding Products in Shopify
- Prepare product title, description
- Gather 3–5 high-quality images, lifestyle photos, optional video/3D, and alt text
- Determine product price, compare-at price, cost per item, and tax settings
- Assign SKU, barcode, stock levels, and enable inventory tracking
- Define variants (size, color, style) with inventory & images
- Enter product weight, mark digital/physical, set fulfillment method
- Optimize URL handle, meta title, meta description, and keywords
- Assign product to collections, add tags, check navigation placement
- Plan upsells, discounts, reviews, and preview product page before publishing
Step-by-Step Process to Add Product in Shopify Store Manually
Step 1: Add a New Product
- Login to Shopify Account
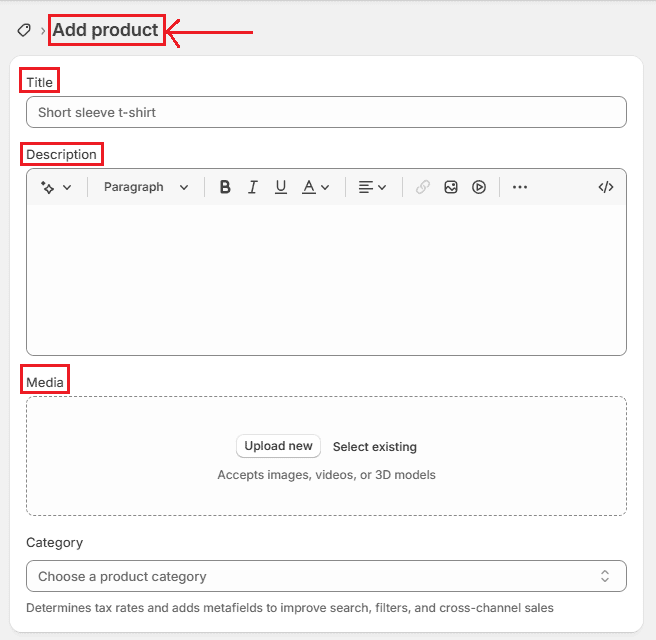
- From your Shopify Admin, go to Products → Add product.
- Enter a title and description.
- Make your title clear and keyword-friendly, such as including the product name and category.
- Write a description that highlights benefits, features, and specifications. Use headings and bullet points for easy reading.
Step 2: Upload Media
- Add high-quality images of your product. Your first image will be the main product photo.
- Upload videos or 3D models if available.
- Don’t forget to add alt text for each image to improve Shopify SEO and accessibility.
Step 3: Set Pricing
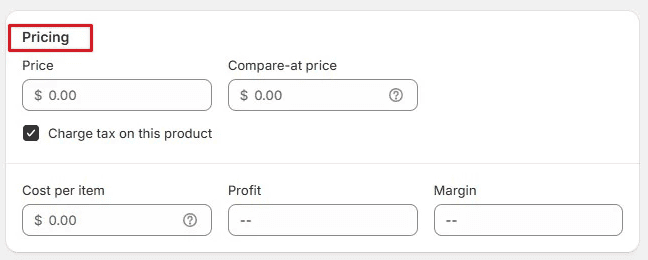
- Enter the Price (selling price).
- If you’re running a sale, add a Compare-at price.
- Add Cost per item (not visible to customers, but helps track margins).
Enable Charge tax on this product if required.
Step 4: Manage Inventory
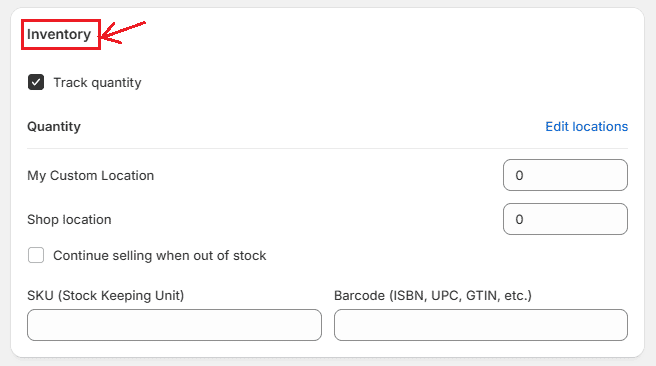
- Add a SKU (Stock Keeping Unit) and Barcode if you have one.
- Enable Track quantity and set stock levels for each location.
Allow Continue selling when out of stock if you want to enable Shopify pre-orders.
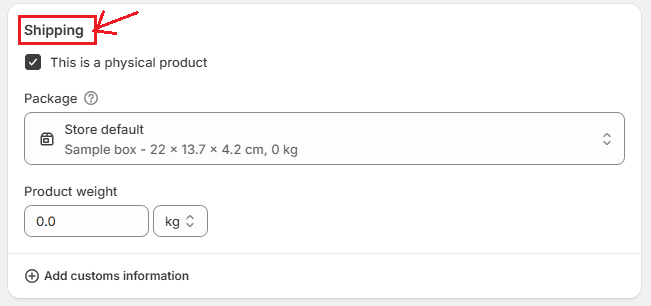
Step 5: Set Shipping & Delivery
- Check This is a physical product if it requires shipping.
- Add Weight for accurate shipping rates.
- For international sales, add HS Code and Country of origin.
If offering pickup or local delivery, make sure those options are enabled in your Shopify shipping settings.
Read More About : How to Add New Pages in Shopify
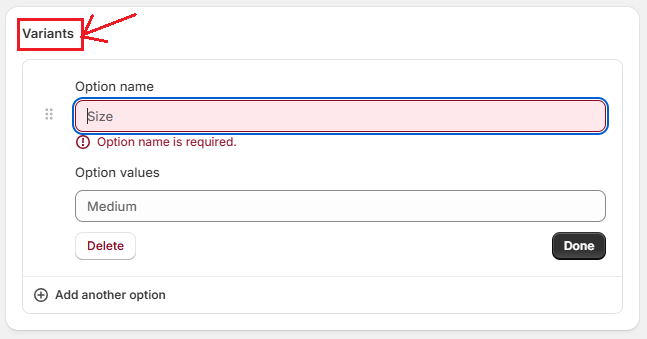
Step 6: Add Options & Variants
- If your product comes in different versions (size, color, etc.), click Add options.
- Shopify automatically generates variants.
Use the bulk editor to update prices, images, and stock levels for each variant.
Step 7: Organize Your Product
- Choose a Product category (helps with tax and channel setup).
- Add a Type (your internal classification).
- Assign a Vendor (brand name).
- Add your product to Collections and include Tags for easier filtering.
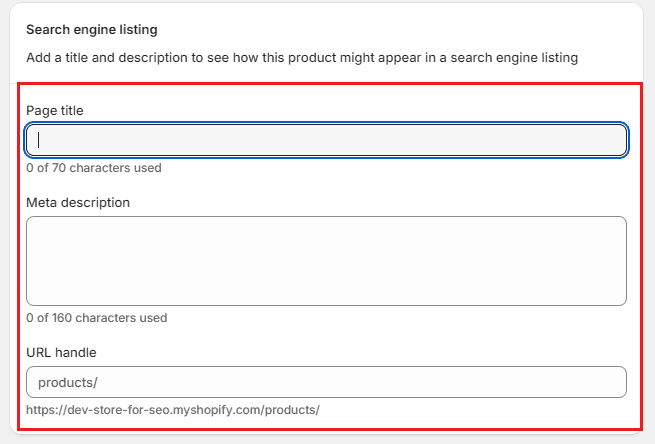
Step 8: Optimize for SEO
- Scroll to Search engine listing preview and click Edit.
- Update the Page title (keep under 60 characters, include keywords like “Buy [Product] Online”).
- Write a compelling Meta description (120–155 characters) with keywords such as “Shopify product setup guide” or “add products to Shopify store.”
Clean up the URL handle to make it simple and keyword-friendly.

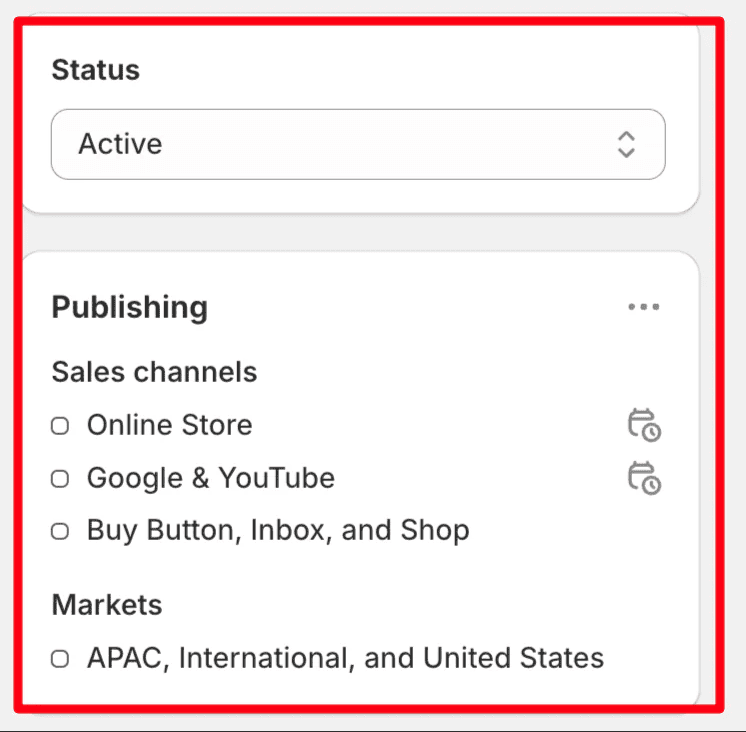
Step 9: Choose Sales Channels & Markets
- Select where the product will be sold (Online Store, POS, Social Media, Google, etc.).
For international selling, check your Shopify Markets settings.
Step 10: Final Touches
- Select a Theme template (default or custom).
- Add Metafields for extra product details like care instructions or warranty.
- Change product Status to Active.
- Save your product.
Step 11: Preview and Test
- Preview your product page.
- Test variant selection, add-to-cart, and checkout flow.
Double-check pricing, taxes, and shipping rates.
Best Practices for Managing Products in Your Shopify Store
1. Update Product Information Regularly
- Edit titles, descriptions, and images to reflect seasonal changes or updated features.
- Refresh product SEO fields (meta title & description) to improve rankings.
- Rotate hero images or lifestyle shots to keep pages engaging.
2. Manage Inventory Effectively
- Track stock levels in your Shopify admin to avoid overselling.
- Enable low-stock alerts or apps that notify you when inventory is running out.
- Use bulk editing to update inventory quantities quickly.
3. Organize Products into Collections
- Create manual collections for featured or seasonal products.
- Use automated collections (based on tags, prices, or inventory) to save time.
- Continuously refine collections for easier customer navigation.
4. Monitor Product Performance
- Use Shopify Analytics to check sales, conversion rates, and product views.
- Identify bestsellers and underperformers, then adjust pricing, marketing, or product details accordingly.
- Track profit margins by monitoring cost per item vs. revenue.
5. Optimize for SEO & Conversions
- Update alt text for images and keywords in product descriptions.
- Use structured data (JSON-LD) for better Google visibility.
- Test different product titles, descriptions, and CTAs (A/B testing) to increase conversions.
6. Manage Variants & Options
- Add or remove variants (size, color, style) as inventory or product lines evolve.
- Ensure each variant has accurate pricing, SKU, and inventory tracking.
- Use swatches or dropdowns to improve the user experience.
7. Enable Pre-Orders & Back-in-Stock Alerts
- Allow pre-orders for upcoming launches by enabling “Continue selling when out of stock.”
- Use apps to notify customers when products are back in stock, boosting repeat traffic.
8. Cross-Sell & Upsell Products
- Link related products directly on product pages.
- Bundle items together for discounts (e.g., “Buy 2, Save 10%”).
- Use apps for personalized recommendations based on browsing history.
9. Manage Product Reviews & Ratings
- Collect customer feedback with review apps (e.g., Judge.me, Loox).
- Showcase authentic reviews to build trust and boost conversions.
- Respond to reviews to improve customer satisfaction and SEO signals.
10. Archive or Delete Old Products
- Archive products you no longer sell but may want to keep for reporting.
- Delete products only when you don’t need historical sales or SEO data.
- Redirect deleted product URLs to relevant categories to avoid broken links.
Final Thoughts
Adding a product on Shopify is more than just uploading a photo and setting a price, it’s about creating a seamless shopping experience. With this Shopify tutorial for beginners, you’ll make it easier for customers to find, understand, and buy your products while boosting your Shopify store SEO.
Krishang Technolab: Your Trusted Shopify Experts for Development and Store Success
Building a professional Shopify store takes more than just adding products, it requires expert development, customization, and optimization. That’s where Krishang Technolab comes in. As a trusted Shopify development company, they specialize in:
- Custom Shopify theme design & development
- Shopify app development and integrations
- Store setup, migration, and optimization
- Performance, SEO, and conversion enhancements
If you’re ready to take your Shopify store to the next level, partner with Krishang Technolab and let their team of experts help you build a store that drives sales and growth.
